Thursday, June 27, 2013

A dummy's guide to removing silk from fresh corn

I. Hate. Removing. Corn. Silk. HATE IT. It's all stringy and silky and I can never get it to all go away. Then I have to pick it out of my teeth for a week (disclaimer- not really a week because I properly brush and floss). I hate it so much so that I don't buy fresh corn that I have to husk and de-silk on my own.  Maybe you have a trick to make it a bit easier. I've tried it.  It doesn't work.  UNTIL NOW....

I came across a pin on Pinterest. I didn't even repin it because I didn't think the miracle trick would work (they never do!). But, I had a recipe my mom and I wanted to try that called for fresh off the cob corn and the husked (husky???) corn was cheaper than the dehusked  ears of corn. I scoured Pinterest for the pin, found it, and tried it out. I figured if it didn't work, I could get my mom to remove the silk. But by golly, the miracle trick worked! You start by placing the entire ear of corn, husk and all, into the microwave. The directions said to microwave each cob for 3-4 minutes for fully cooked corn. I didn't need fully cooked corn, so I threw two cobs in and microwaved them for 3 minutes. I think I've seen this where you throw the whole corn into boiling water and cook for longer, but nobody got time for dat. Take the microwaved corn (caution- may be hot) out of microwave and cut the bottom 1-2 inches off the bottom of the cob. Then, start squeezing the top of the husk and the corn will slowly come out of the bottom with very little to no silk! The website made it seem like you just barely apply pressure to the top and the cob just pops out....I didn't find it that easy. Maybe if I had fully cooked the corn? Anywho, I'm not going to shy away from husking corn again!
Freshly husked corn. Hard to tell, but very little silk left.


This is the silk that I had to remove from two ears of corn after trying the miracle trick!

Now, the second part of this post isn't a review of a Pinterest pin. The following recipe was from an article found by my mom. It was about a trio of salsas, none of them tomato based. One was an apple pepper salsa, another was a strawberry fennel salsa, and the last was a cucumber corn salsa. I am hoping that you can guess what we made based on the first half of this post. I tasted the cucumber corn salsa right after making it and it tasted pretty good. I put it in the fridge and then had some with dinner a few hours later...AH.MAZE.ING. The flavors had a chance to mesh and it was very yummy. It tasted like summer. The article that the recipe came from said you can eat it with chips, add it to burgers, etc. We started out eating it straight up. I ended up mixing it with some BBQ that I was eating and it was delicious! Here's the recipe if you want to try it.
 
CUCUMBER-CORN SALSA
Start to finish: 10 minutes (it took me about 20 minutes...I'm slow)
Makes 3 cups
2 ears of corn, husks and silk removed
1 large cucumber, peeled, seeded and chopped
2 stalks celery, chopped
4 scallions, thinly sliced
2 tablespoons chopped fresh dill
Zest and juice of 1 lemon
Hot sauce, to taste (we didn't add this)
Salt and ground black pepper
Carefully cut the kernels from the ears of corn. To do this, one at a time stand each ear on its wide end and use a knife to saw down the length of the cob.
In a medium bowl, combine the corn kernels, cucumber, celery, scallions, dill, and the lemon zest and juice. Season with a splash of hot sauce, salt and pepper.
Nutrition information 1/2 cup: 45 calories; 10 calories from fat (22 percent of total calories); 1 g fat (0 g saturated; 0 g trans fats); 0 mg cholesterol; 10 g carbohydrate; 2 g fiber; 3 g sugar; 2 g protein; 105 mg sodium.

Monday, June 17, 2013

Rag Quilt Animals

I've been waiting over a month to post this entry. I came across a picture of a Simplicity pattern on Pinterest. That's it. No step by step instructions, no photos taken periodically as the project was completed. Just a picture of the pattern envelope. I filed the idea away for future use.  

Fast forward a couple of months. While shopping for fabric for another project, I remembered the pattern. I looked through the files in my local JoAnn's and voila! Found the envelope. I have two little sibling cousins who have extremely close birth dates, so I thought I would make a quilt for them to share. After I made the quilt, I realized how ridiculously easy it was, so I made two. I put my own spin on the pattern in order to personalize the two quilts. Then I had to wait a month to give them to the girls before I could blog about the project. Enjoy!  


 The first cat quilt, almost completed. At this point, I hadn't figured out how to personalize the project.  


Trying to decide if I should use a Peanut head or a cat head for the second quilt....


Two finished rag quilts.  I decided to add a collar and embroidered the girls' names onto them.


I think she liked it......


This pattern can be used to make a cat, rabbit, or a bear. I also bought this pattern and can make a turtle, dinosaur, or a caterpillar. I'm toying with the idea of buying this pattern so I can make the butterfly, flower, or the super cute owl. Anybody interested in a quilt? You could buy your own fabric and just pay me for the time spent on making it!  :)  


Tuesday, June 4, 2013

Skinny Spaghetti Squash Alfredo and Roasted Broccoli

Tonight I made two recipes that I have found on Pinterest.  I love trying new recipes but when it usually is just four year old Peanut and I eating dinner, I tend to stick with quick and easy.  We have an 11 year old friend staying with us for a couple of days so it gave me a reason to cook!

The meal was totally vegetarian.  I'm not sure if I had all the proteins you need and whatever....I'm not a vegetarian.  I just know there was no meat involved in the making of this meal.  Both the 4 and 11 year old loved it.  The 11 year old scarfed down two huge servings, almost like I hadn't fed her at all today (wait....did I?)


The Main Dish

My main dish was Skinny Spaghetti Squash Alfredo. Follow the link to get to the recipe and to see a prettier picture of what it's supposed to look like.  Super yummy, very rich tasting for it to be "skinny". It takes about an hour to cook the squash, so about 15 minutes before it finishes, make the sauce.  I wanted leftovers for the Woodman to take to work tomorrow, so I used two squash (squashes?) and then doubled the recipe for the sauce.  From what I saw, you probably didn't need to double the sauce recipe.  The four halves of squash were swimming in sauce, and I had a bunch of sauce left in the pan. I will definitely make this again.  I bet it'll taste even yummier when I can harvest a spaghetti squash out of my garden! 

The Side Dish

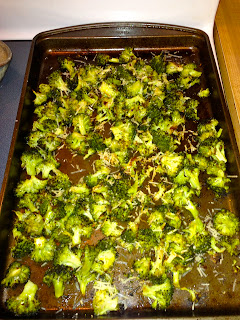
I have seen the pin for Roasted Broccoli for quite some time now. Every time I see it, the description always says "I'll never make broccoli another way again" or "Ridiculously amazing broccoli".  Well, I'll never make broccoli another way again! It was ridiculously amazing! A time saving tip- get bags of broccoli florets from the produce section of your grocery store. I bought 2 huge heads of broccoli and had to cut it up into florets. Not a HUGE time saver, but if you make both of these for the same meal, you might want to skip the step of cutting the broccoli up.  


 I whole-heartedly recommend both of these recipes!  Bon Appetit!