Thursday, May 30, 2013

Toy Jail


Look at that body language. It's saying, "I'm devastated and I have the worst mommy ever for putting my favorite toys into toy jail!!!!"

Let's rewind a little bit. Say, a month or so. We had been fighting for weeks to get Peanut to be more responsible and pick up his toys on his own. He would argue, pitch fits, whine, and try to talk us into helping him clean up his mess. Finally, I SNAPPED slightly lost my temper and proceeded to get the box of trash bags from the kitchen. He sat dazed while I pulled out the first bag. Once it dawned on him what was happening....  NOOOOOOOOOOOOOOOOOO! Grabbing on my clothes, screaming, throwing himself on the floor. I filled up three trash bags full of his junk that he refused to put away and took them out to the garage. Thinking he was a pretty smart little dude, I told him that if he started cleaning up on his own, I wouldn't "throw away" any more toys. I ended up collecting two more bags of toys. (Um.....maybe he has too much stuff if I was able to collect 5 trash bags of toys???) It took him at least an hour to fully calm down so we could discuss what had happened. I admit....probably not my finest mothering move. I'm still waiting for my "Mother of the Year" plaque to arrive for this episode. It took about a month for me to bring back the toys. He wasn't completely without toys. There were a few odds and ends left behind that survived my rampage. Plus, he got very creative and his favorite toy during this time was a long cardboard roll that he used as a sword (See, I was really just trying to jump start his creativity!).  

During the month where his toys were "thrown away", I came across the idea for toy jail on Pinterest. We went to Target and got a clear tub to use as jail. I figured a clear one would be better so Peanut could see the toys that were incarcerated. I explained that any toys left out after he went to bed, they would be jailed and he would have to do work to get them back. He seemed excited about this, which meant he really didn't grasp the abstract idea of toy jail and he needed to see it in action . He was good about cleaning up his toys....until last night. I gathered up the things he left laying around and locked them up!

I knew he would be upset when he saw his two favorite toys in jail- his light sabers (or savers, according to him). Peanut found the toy jail this morning, hence the first picture of the post.  

Once he settled down, I let him choose his chores he needed to complete to bail his toys out. Actually, there are some active "fun" things he could do as well. Here's what he picked....
Eventually, it'll be a chore per toy. But instead of making him do six separate things this first time, I just had him do three. His first job was to jump up and down. He loved it!
Next came dusting. He had never dusted before, but once I told him what to do, he actually enjoyed it! Notice Lucky supervising.  

Last came sorting laundry. No pictures here. Didn't want everyone to see the mountains of laundry I had to do, plus any unmentionables that may be visible in the different piles!  

As Peanut completed each task, he got two toys out of jail. By the end, he was cheering because he had freed all of his stuff. He is really a good helper, once you get him motivated, and he enjoyed helping Mommy out. I figure after a few weeks the fun factor will drop off and he just won't care enough to want to free his toys. At that point, I'll add the final rule for toy jail- any toy not set free after a week will be taken to Goodwill!

My verdict on toy jail- two thumbs up!  


Sunday, May 26, 2013

Wood Butter

I recently thought back to what my spoon guy told me when I first met him. Wait...doesn't everyone have a spoon guy?  No?  Well, I met my spoon guy at the Yellow Daisy Festival, which is an arts and crafts festival that happens in September at Stone Mountain.  We have a pretty steady relationship.  I visit him every year at the Yellow Daisy Festival and I buy a hand-carved, wooden spoon.  Not just any type of spoon....a LEFT HANDED SPOON!  Yes, there are spoons made just for us lefties.  Angled just so to make cooking that much easier for us.  So much better than those horrible left handed scissors that teachers tried to make us use in elementary school.  If you were lucky, your teacher might have had one pair that you and the other two lefties in the class had to share.  Survival of the fittest dictated that you adapt to the righty scissors, which I did. I felt dirty and swore I would never again bow down to the man that is the right handed world.  But I digress. This post isn't about the unfairness of the world to lefties.  It's about wood butter.

Back to my spoon guy.  When I bought my first spoon, he told me that wooden utensils tend to dry out.  When they need a "drink", lightly sand them and then rub them with mineral oil.  I believe I left the festival and went straight to the store to buy these two items.  I wanted to baby my spoon.  Each year, I go back to him, get a new spoon, and get the same lecture about giving my spoons a drink.  And I hate to admit that over time, I have begun to neglect my spoons.  They were all dried out and rough to the touch and I really didn't want to take the 4 minutes to give them their drinks!

I came across the following pin on Pinterest- DIY Wood Butter.  A wood conditioner, if you will, for wooden utensils and cutting boards made with two ingredients: beeswax and mineral oil.  I could hear my spoons from the kitchen calling out (in teeny tiny voices) "We want wood butter!"  I'm not a savvy shopper.  I can't think of where to buy beeswax and mineral oil off the top of my head, so I wander over to Amazon.com.  Within 2 business days, I had my ingredients and made my wood butter.  The process was simple enough.  Following the girl's recipe in the above link, I melted and mixed my ingredients and poured them into Mason Jars.  It made a mess though and I thought I ruined my canning funnel and my 5 qt. mixing bowl I used to melt the beeswax in.  I could not get the re-solidified beeswax off of those two items.  After letting them soak in soapy water overnight, two hand washes, and a run through the dish washer, they were as good as new. After I let the wood butter cool, I put some on a clean, dry paper towel and buffed it into one of my spoons.  I swear it said, "Ahhhhhhhhh.....that hit the spot."  He looked all shiny and happy and hydrated.  Take a look at the picture.  Don't you agree that my spoons look happy?
So, to see if anyone is actually reading this.... I ended up with 6 jars of wood butter.  I don't need 6 jars of wood butter because a little goes a long way. I will give away 3 jars to interested people.  Just let me know and I'll find a way to get it to you.  PS- it makes a wonderful lotion for dry skin.  Absorbs fast and lasts forever! (Ok, not really forever, but a really, really long time).

Thursday, May 23, 2013

Previous Projects

I've just spent the past 30 minutes going through my iPhoto looking for all of the ideas, projects, crafts, or recipes that I've found and made on Pinterest.  I didn't realize I've completed so many!  Here are some of my adventures....


My very first rag quilt, made for sweet little baby EN.

 A zigzag quilt I made.  There was a shortcut for this, where you didn't have to sew a ton of different rectangles together to make each quilt square.  I made this in March or April of 2012, so I don't remember what the shortcut was!  I guess I'll have to go back to Pinterest to see!


Another rag quilt that I made for Peanut.  He picked out the colors himself!


Reese's Pieces cookie cuppycakes that I made for the Woodman's birthday.


Another rag quilt....I think this was made for sweet baby AH.  


Cinnamon sugar doughnuts made from biscuits.  They were horrible.  Absolutely disgusting.  So horrible that I wanted to sacrifice myself and eat all of them so that the Woodman wouldn't have to suffer.....  PS-  I'm not allowed to make these again.  They were like crack.  

Some sort of chicken, potatoes, and beans cooked all in one dish meal.  I think you put all these in a dish, melt some butter over all of it, and then sprinkle with a pack of Italian dressing mix.  Muy yummyo!


The next two photos are of Peanut's Santa sack. The idea behind this is that our Elf on the Shelf drops it off at our house on Christmas Eve.  Peanut then has to go through his old toys and put a few in for Santa to give to needy children.  Then Santa leaves Peanut's new toys in the sack.  


Peanut's birthday teepee
 I saw several different types of teepees on Pinterest and it planted the idea in my head.  I found a Simplicity pattern at JoAnn's Fabrics and made this! 


Sesame Teriyaki Spaghetti Squash with Edamame
A big hit!  So much so that my four year old wanted to plant spaghetti squash in our garden this year!


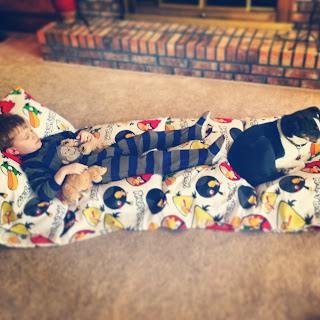
Peanut's Lucky's Pillow Couch
I came across this ridiculously easy project and made it for Peanut.  Unfortunately, Lucky has claimed it for himself.  He allows Peanut to use it from time to time.  Maybe I'll make another one for Peanut one day...


Cauliflower Pizza Crusts
These were surprisingly good, although time consuming to make!  Peanut enjoyed getting to create his own pizza.  He devoured it!


Peanut's new favorite game!  He loves sweeping dirt into the square!  He now walks into the kitchen (sometimes even with pants on!!!) and will sweep if he sees dirt!


Bath dirt
This was a big hit too!  Baking soda+ food coloring= an hour of bath time fun!  

Bath finger paints
These were super easy to make!  Peanut had so much fun I had to drain the water and add warm water again.  He was all prune-y when he got out of the bath that night!


Growing food from scraps
This was an experiment I conducted.  The first photo shows day one, middle photo is day four, and bottom photo is day seven.  Since this picture, I've added the bottom of a head of romaine lettuce.  Not sure if that will regrow like the celery.


My flower pot tower
This was a super easy and relatively cheap project.  It took awhile to finish though.  I was sooo excited to start this.  I began on a really warm day in late January by spray painting a clear coat on the pots.  Then we had 10 weeks of cold weather and the spray paint instructions said no spray painting under 65 degree weather.  Then they sat empty for another couple of weeks until it warmed up to plant my basil.  The basil has recently been pruned, hence the small size.


The last two photos aren't my Pinterest projects.  These are the Woodman's projects.  The first is our green bean towers.  As the beans grow, they'll wrap around and grow up the tower.


The Woodman's fire pit
This sucker is the BEST!  It is well used.  Many a s'more has been made over it.  

Well, I think that's everything I've made so far from ideas I've seen on Pinterest.  My next post will be about my adventures in making wood butter.  Wood butter, you ask?  Stay tuned to find out! 


Wednesday, May 22, 2013

I'm a blogger virgin!

Who has two thumbs and is going to start blogging?  This gal!  Who knows if I'll keep up with it.  Who knows if I'll have anything interesting to say.  Who knows if anyone will actually read it....

I'm addicted to Pinterest.  There, I've got that out of my system.  They say that acknowledging you have an addiction is the first step to recovery.  Now, who exactly they are, I don't know.  My thoughts are to try out different Pinterest crafts, DIY projects, recipes, etc. and write about my findings.  I'm sure other people out there in the blogging universe have already come up with this idea.  I even Googled the name "Adventures in Pinteresting" and came across a blog by this title....but she hasn't posted since January.  Soooo, I'm going to go ahead and use the title.

I think my first official post will be about all my past Pinterest projects I've completed.  While debating this blog, I realized I've done a bunch of stuff!!!!  As I go, I'll learn how to make my blog a happy and pretty place.  Until then....  Happy Pinteresting!